STM32 Development on Debian
The Ubuntu VM I have been previously using for STM32 development is rapidly falling out of date. Rather than upgrade it I fancied a change (albeit a small one), so I thought I would spin up a Debian VM. I figured it would be helpful (to me if to nobody else) to document the steps required to get it up and running.
It you are already familiar with setting up a Linux VM (or, before anyone interjects a “GNU/Linux” VM), some of the steps below might be a little tedious since I walk through the process. If you are more interesting in installing the dev packages, skip to just after halfway.
This guide will be tailored to configuring a Debian VM for C language development for the STM32F4DISCOVERY (STM32F407) board. If you are using a different board that is supported by OpenOCD (and ChibiOS for the demo) hopefully the information here will come close to getting you a suitable environment.
I’m assuming you are somewhat comfortable with a Linux distribution already, or at the very least eager to learn. If you are a Linux newbie, and found this because you were curious, you still should be able to get set-up with little bother, as it’s mostly copy-paste. However, this is more a walkthrough than a learning tutorial so I would recommend searching about for some training material. I found LSF101 to cover the groundwork pretty well.
Installing the Guest OS
Debian ISO
Obviously Debian will be required for this. An ISO can be readily downloaded from the Debian website. You will find there are multiple versions available, varying not only for system architecture but also with quantity of bundled packages.
I chose the amd64 variant (for my 64-bit host machine) of the version tailored for “Small CDs or USB sticks”. Picking one of the larger versions however may save time during the installation process.
VM Software
You could, if so desired install Debian as your main operating system, or even dual boot. I’ll be running it as a Virtual Machine just for development purposes. I will, somewhat guilty admit that my everyday OS is Windows.
To my knowledge, there are two popular free (as-in-beer) Windows programs which facilitate running a VM:
Or at least these are the two programs I have used in the past. Each has its own pros and cons. Normally, for a bog standard Linux VM I would choose VirtualBox. In the past however, I have found VirtualBox to be very flaky when it comes to USB devices (which is obviously a huge inconvenience for programming the STM32F4DISCOVERY).
It was admittedly some time ago since I last attempted using VirtualBox for MCU development so it may well be more stable now, but I’m going use VMware Player here.
VMWare Player Set-up
The installation process of VMware Player is fairly typical of a Windows program, so I’ll skip over that.
Note: it is possible that in order to run the VM, a BIOS/UEFI setting may have to be tweaked.
The process of installing Debian in a VM took me about 30 minutes to complete. Your full attention is not required for this period, as at least for the smaller “netinstall” iso, considerable time was spent downloading and installing packages.
An overview of the required steps is detailed below:
-
From the VMware Player UI, click
Player->File->New Virtual Machine-> Installer disc image file (iso)selecting the Debian iso downloaded previously. -
Choose in what directory you want the VM to live.
-
You will be asked how large you want the virtual hard disk to be. It’s a good idea to increase this from the default of 20 GB, as having to add a second hard drive later on can be a bit annoying. Obviously the size really depends on your use case (how many programs you plan on installing etc.), but bumping it up to at least 40 GB would be advisable. (Once I was up and running Debian reported that I was using just under 5 GB of space).
-
The next screen will allow you to customise how VMware will see your hardware. Unlike the hard drive size, these can be readily changed in the future so you don’t have to worry too much about them now:
- Memory - I’m running this on a desktop with ample (16 GB) RAM, so I increased this setting from the default 512 MB to a more generous 2 GB. 1 GB probably should be enough, if you can spare it.
- Network Adapter - The NAT default setting should be fine if you simply want internet access. If you desire to run a server on your VM, you’ll want to go for bridged to allow configuring it to have its own IP on the LAN.
- Processors - I’ve seen some conflicting reports about how this affects performance. At the time of writing the VMware documentation on the subject doesn’t seem to be as helpful as the equivalent VirtualBox documentation. Leaving this at 1 should be perfectly fine. My host machine has a i5-4690 with 4 physical cores, so I’m going to try setting this to 2.
Clicking finish should result in VMWare booting the iso, and starting the Debian installation process.
Debian Install
As a rule of thumb, when presented with multiple options the selected default will be a pretty solid choice. If you think a setting needs to deviate from defaults more than likely you already have a good idea as to what it does.
Note: When you click into the VMware window it will capture the mouse. To get it back into Windows, press Ctrl + Alt.
On the bottom/ bottom left of most screens the Debian install process will provide instructions on how to navigate the menus.
-
The first screen presented is the install boot menu. Since we are obviously here to install Debian on the VM, press Enter with “Install” highlighted.
-
This is followed by a language select, keyboard and other localisation configuration screens. Choose whatever is appropriate for you, again using arrow keys/Tab, pressing Enter to confirm.
-
The next screens will allow you to choose a hostname for the system. Feel free to choose something witty, or alternatively you can be boring and leave it as the default of “debian”. The domain name can typically be left blank.
-
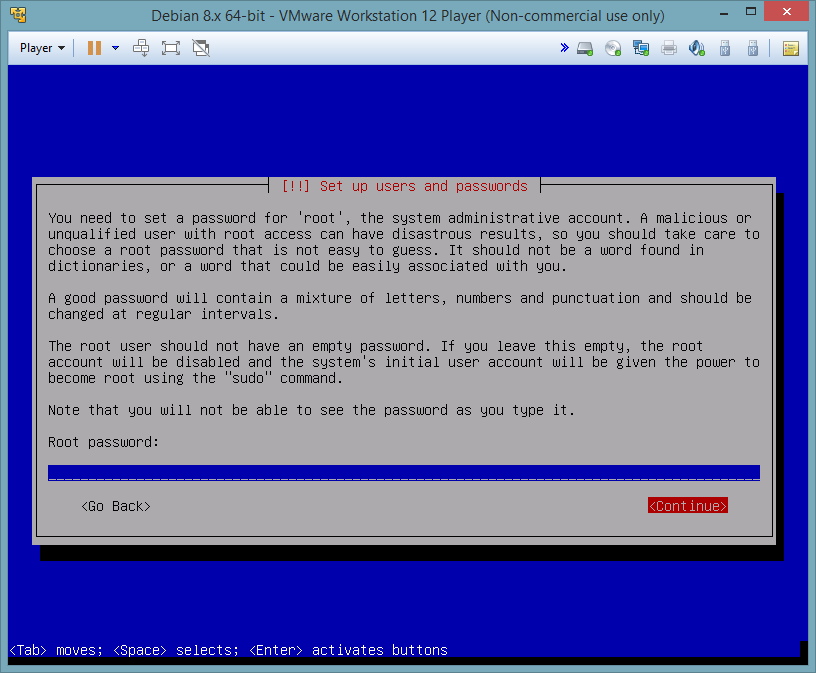
You will be asked to set a password for the root (superuser account). If so desired you can set this, or as per the on screen description you can leave it blank, resulting in the user account having superuser privileges. Personally, I prefer doing this rather than bothering with a root account.
-
Debian will proceed to ask you to create a user account, providing full name, user name and password. If you left the root user password field blank, this will be the initial superuser account for the system. (Make sure you remember the username and password combination you chose).
-
Disk set-up is next. If so desired you can tweak this manually, but for what we want here, all the default options should be fine, so proceed until you are asked write changes to disk. This will result in a brief wait while some installation occurs. If you have a craving for caffeine resist the urge to go for some coffee just yet…
-
The following prompt will request that you provide some locale information for the package manager. Presumably, it’ll be basing this off the language information previously provided so it may well already be correct. As suggested by the hint, leave the mirror as the default, “ftp” variant. Typically the HTTP proxy can be left blank.
-
The next decision is what desktop environment you want to install. I suggest having a quick Google at this point to see if one of the options appeals to you more than the others. I am just going to leave everything as the default, as my preferred window manager is (sadly) not on the list. This then leads to the longest installation interval, at least if like me you used the smaller iso image. Now is a good time to go make that coffee.
-
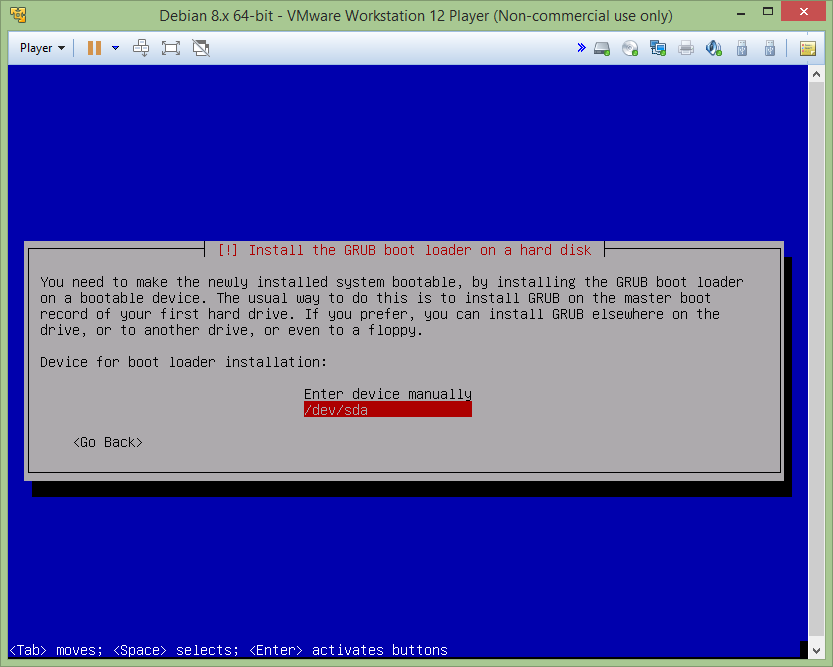
The last installation decision is about whether you want to install GRUB. (You do). Choose the single hard drive presented (likely /dev/sda) as the install location.
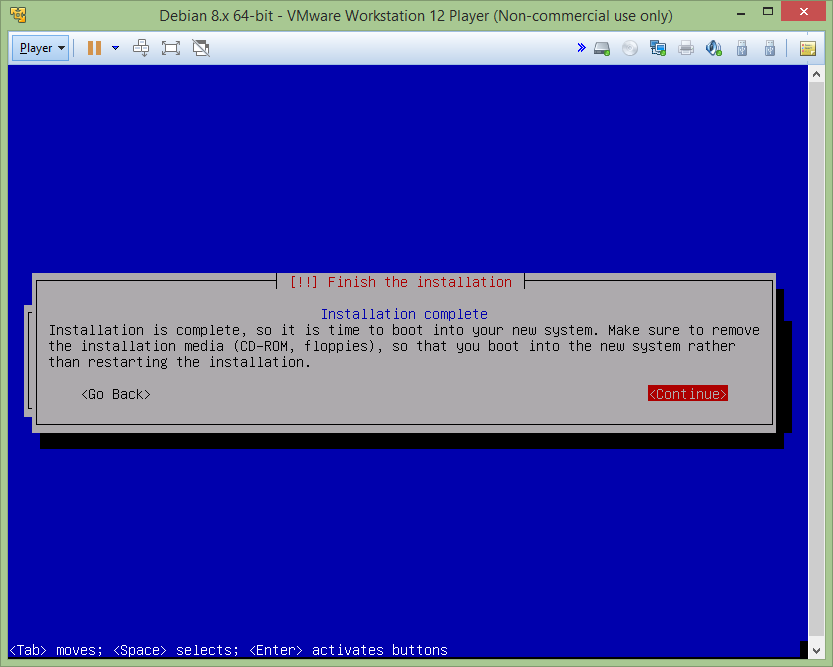
- And volia, the installation is complete! You should see a prompt such as that shown below. Press continue and let the system reboot. After a few boot log messages you should be presented with a log on screen. The log on credentials being what you provided previously.
Installing VMware Tools / open-vm-tools
Before proceeding to install the development packages, you will want to ensure VMWare tools is installed. This package allows better interoperability between the host machine and guest systems. The small but important features provided include being able to copy clipboard content between Windows host and Debian guest, and automatic resizing of the guest display with the VMWare window.
It used to be VMware tools had to be installed via mounting a virtual CD through VMware, however on Debian at least this appears to have been superseded by the open-vm-tools package.
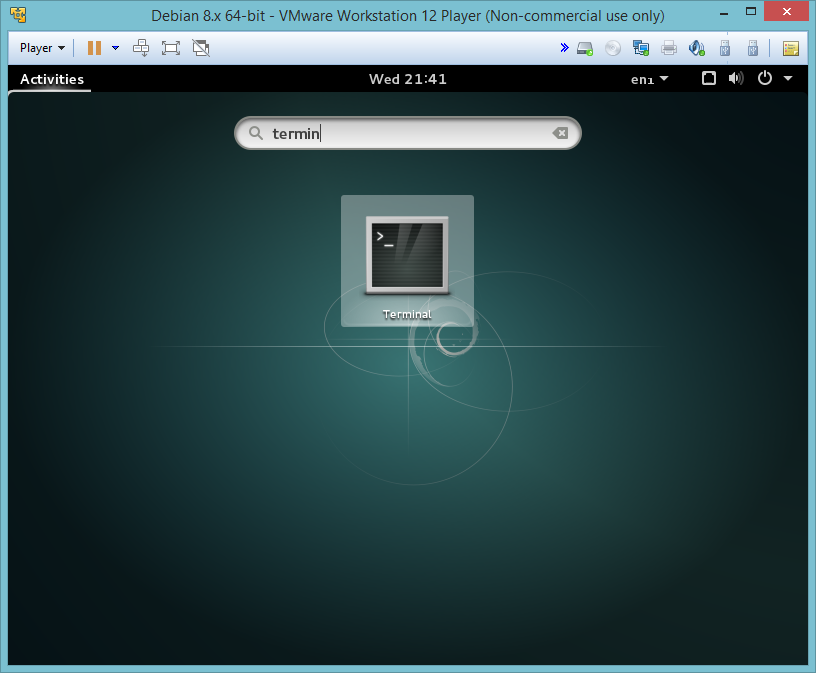
All packages installed/configured from this point are going to be done via the command line. In the default desktop environment installed, the default terminal emulator is conveniently called Terminal. To open it up, click on Activities and search, as seen in the screenshot below.
Below are the commands required to be issued in Terminal. Note these commands require to be issued by a administrator, which if you left the root password empty during the installation you already should be. The first time issuing a command prefixed by sudo in a terminal, you will be prompted for your account password.
sudo apt-get update
sudo apt-get install open-vm-tools open-vm-tools-desktop
You might want to log out/restart at this point to allow the tools to kick in.
Congratulations, at this point you now have a clean Debian Virtual Machine!
Installing Development Packages
Minicom (Optional)
I happen to have an (overpriced) FTDI serial to USB cable. To be able to use this in Debian, a program which allows reading of / writing to the serial device will be required. One such program available is minicom. The below commands will install it:
sudo apt-get install minicom
# Allow use of serial ports without superuser privileges
sudo adduser $USER dialout
GCC
We will need a suitable cross compiler for the ARM Cortex-M processor.
Luckily, we can obtain appropriate GCC and GDB packages easily with the following command. These won’t be the most up to date versions but should be more than suitable for what is required.
sudo apt-get install gcc-arm-none-eabi gdb-arm-none-eabi
Git
We are going to be building some packages from source, so we’ll need git (a version control system) to retrieve the appropriate versions of various projects.
sudo apt-get install git
Set-up
Its good practise to use a sensible directory structure to download and build packages in. Below I set two environmental variables pointing to suitable directories which I will be re-using in many of the later commands. Feel free to change the paths as desired.
Note, these created variables will only exist within a terminal for the lifetime of that terminal session. So opening new terminals etc. will require these variables to be recreated.
export TUTS_TOOLS=~/programming/embedded/tools
mkdir -p $TUTS_TOOLS
export TUTS_LIBS=~/programming/embedded/lib
mkdir -p $TUTS_LIBS
OpenOCD
OpenOCD is an on circuit debugger, which is ultimately going to be responsible for communicating with the STM32. As you will see later, there will be little interaction with this program - once started it will act as a bridge between the STM32 and GDB.
There should be version of OpenOCD installable through apt, which you can feel free to acquire if so desired and ignore the following. Like GCC this version will likely be a little out of date. However, unlike GCC I prefer to keep this program reasonably up to date so I will be building it from source. The following commands should see to this:
# Get dependencies
sudo apt-get install gcc make libtool pkg-config autoconf automake texinfo libusb-1.0-0-dev

# Get OpenOCD source code
cd $TUTS_TOOLS
git clone git://git.code.sf.net/p/openocd/code openocd
cd openocd
git checkout v0.9.0

# Build it
./bootstrap
./configure
make

# Optional? I didn't bother the the following step, and didn't investigate what it does. I would hazard a guess that it installs OpenOCD to the system path. The next step likely makes this redundant.
#sudo make install

# Move files to one directory, as suggested in http://elinux.org/Compiling_OpenOCD_v0.7.0_on_Ubuntu_13.04
mkdir -p $TUTS_TOOLS/openocd-bin
cp -R tcl/* $TUTS_TOOLS/openocd-bin
cp src/openocd $TUTS_TOOLS/openocd-bin/

# Allow use of OpenOCD without superuser privileges
sudo cp contrib/99-openocd.rules /etc/udev/rules.d/
sudo adduser $USER plugdev
ChibiOS RTOS
ChibiOS is a pretty nifty Real Time Operating System (RTOS) which I’ve been playing about with for sometime. It has pretty solid support for STM32 parts, including a Hardware Abstraction Layer (HAL).
In this guide, I’ll be using it for a demo program it provides for the STM32F4DISCOVERY.
The official source code is (sadly) tracked in a subversion repository on SourceForge. The commands below will retrieve the source from a community mirror which is available on github.
cd $TUTS_LIBS

git clone https://github.com/ChibiOS/ChibiOS.git
cd ChibiOS
git checkout stable_3.0.x
Taking it for a Spin
Connect the Hardware
Firstly, the two adduser commands issued above require a logout and login (or reboot) to become effective. So make sure to do that now before continuing any further.
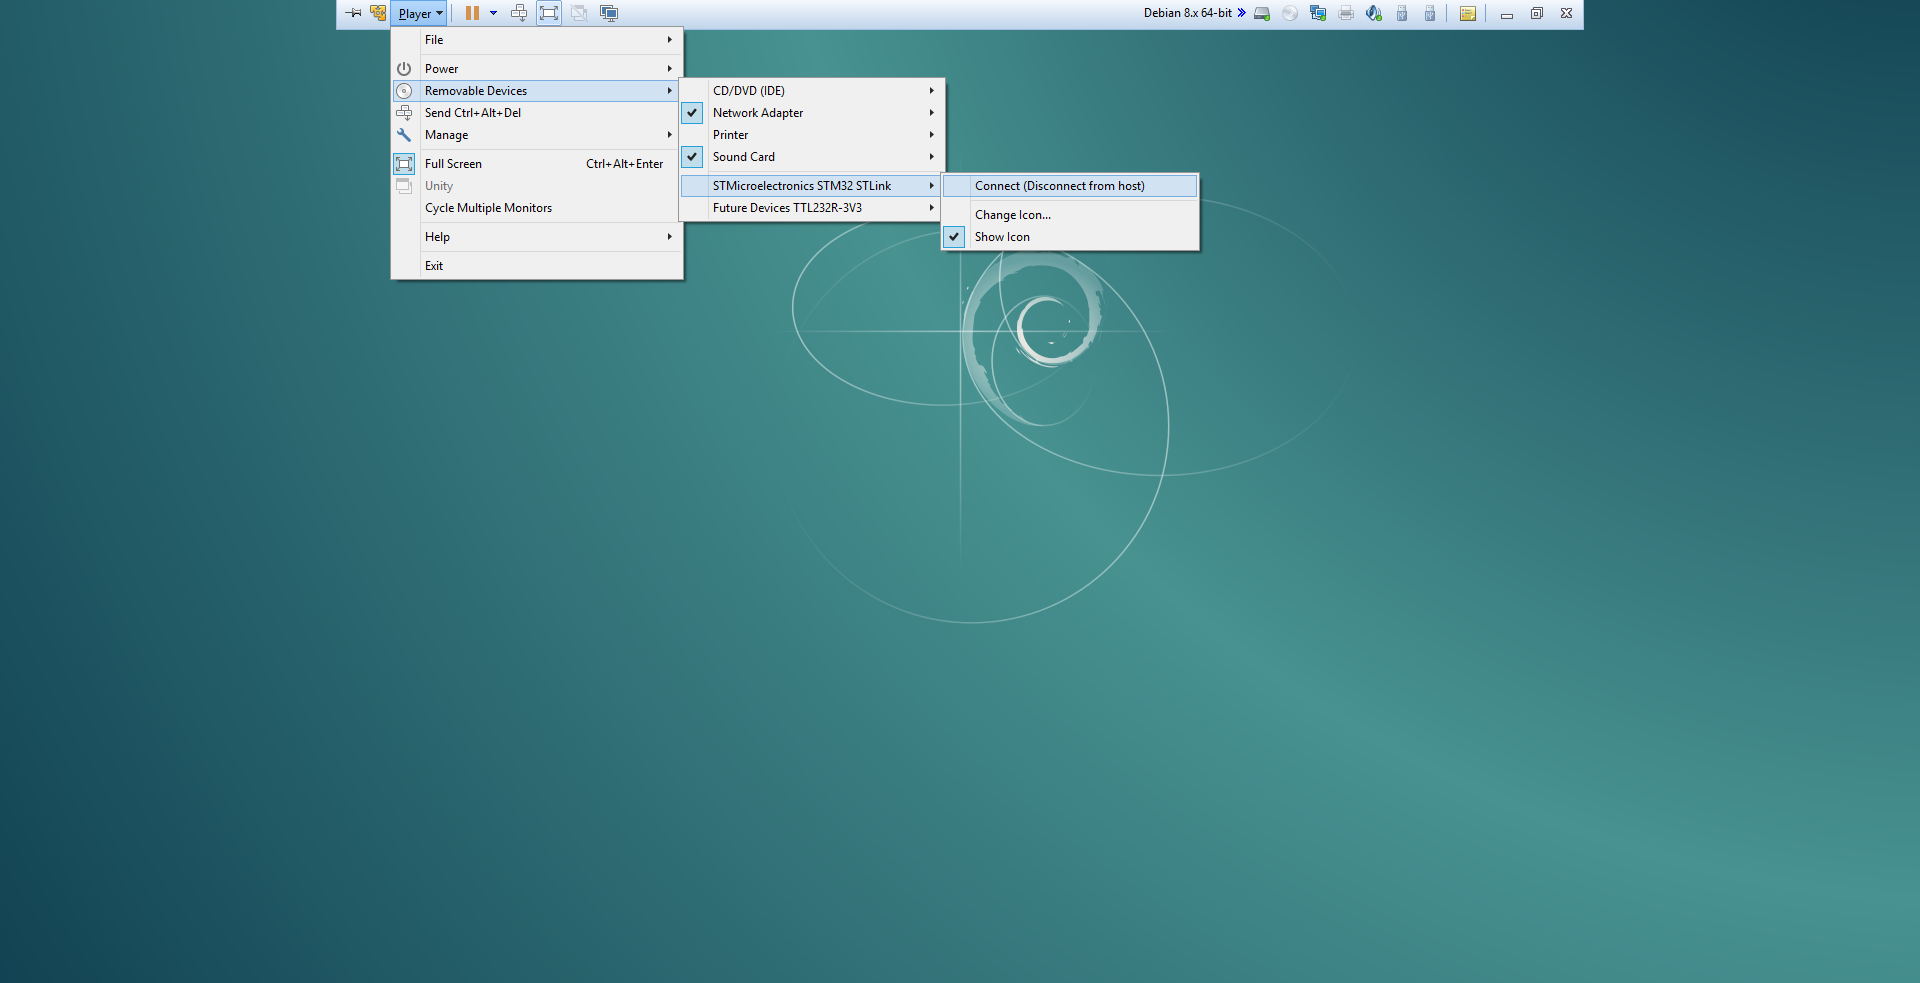
Next, connect your board to your computer via USB. In VMware under Player->Removable Devices you should hopefully see the option to connect your board to the VM, as pictured below.
Build the Demo
To test that everything is working, we are going to compile a ChibiOS demo for the board, flash it to the MCU and run it. The following commands will build a demo for the STM32F4DISCOVERY board.
cd $TUTS_LIBS/ChibiOS
cd demos/STM32/RT-STM32F407-DISCOVERY/
make
Run OpenOCD
We are going to need another terminal for OpenOCD. In the “Terminal” program in the default Debian desktop environment, File->Open Terminal will get you there faster.
You’ll need to set the TUTS_TOOLS variable again to use it in a new terminal. To get to the OpenOCD binary:
cd $TUTS_TOOLS/openocd-bin
Now, I have what I believe is the “original” STM32F4DISCOVERY and the newer STM32F407G-DISC1. The below command works fine on the original, however it failed to work on the STM32F407G-DISC1.
./openocd -f board/stm32f4discovery.cfg -c "stm32f4x.cpu configure -rtos ChibiOS"
After some head scratching I turned to the user manual which notes that the STM32F407G-DISC1 uses ST-LINK/V2-A over ST-LINK/V2 (page 11 of DocID022256 Rev 5). This is something OpenOCD needs to be aware of, which the following altered command will see to:
./openocd -f board/stm32f4discovery.cfg -f interface/stlink-v2-1.cfg -c "stm32f4x.cpu configure -rtos ChibiOS"
The expected output of this command should resemble the below, and importantly leave OpenOCD happily running in the terminal.
Open On-Chip Debugger 0.9.0 (2016-02-10-21:58)
Licensed under GNU GPL v2
For bug reports, read
http://openocd.org/doc/doxygen/bugs.html
Info : The selected transport took over low-level target control. The results might     differ compared to plain JTAG/SWD
adapter speed: 2000 kHz
adapter_nsrst_delay: 100
none separate
srst_only separate srst_nogate srst_open_drain connect_deassert_srst
Info : Unable to match requested speed 2000 kHz, using 1800 kHz
Info : Unable to match requested speed 2000 kHz, using 1800 kHz
Info : clock speed 1800 kHz
Info : STLINK v2 JTAG v14 API v2 SWIM v0 VID 0x0483 PID 0x3748
Info : using stlink api v2
Info : Target voltage: 2.880282
Info : stm32f4x.cpu: hardware has 6 breakpoints, 4 watchpoints
Connect GDB to OpenOCD and Run the Demo
Now we need to fire up GDB, so open terminal number three.
cd $TUTS_LIBS/ChibiOS/demos/STM32/RT-STM32F407-DISCOVERY

arm-none-eabi-gdb
Once GDB has loaded, and you are presented with the (gdb) prompt the following commands are required to connect to OpenOCD and get the program running on the board.
Note: Typing these commands every time, gets very old, very fast. I would recommend storing these commands in a text file and sourcing the file with the -x argument to GDB each time you start it.
set print pretty on
target remote localhost:3333
monitor halt
monitor reset
file build/ch.elf
load
continue
If all goes well the orange LED (LD3) should start blinking happily away. You now have the ChibiOS demo running on the STM32!
Serial Communications via Minicom (Optional)
Since I have an FTDI cable, I figured I might as well use it. Serial output can be pretty useful for some high level debugging among other things. The GPIO pins used in the demo are listed below. Like the dev board, it should show up under Removable Devices in VMWare.
| Pin | Function |
|---|---|
| PA2 | USART 2 TX |
| PA3 | USART 2 RX |
We now need to know what tty device it is mapped to. The following will search the driver messages for appropriate references.
dmesg | grep FTDI
The output of this command should resemble the following:
[ 2776.710734] usb 2-2.2: Manufacturer: FTDI
[ 2777.751054] usbserial: USB Serial support registered for FTDI USB Serial Device
[ 2777.751077] ftdi_sio 2-2.2:1.0: FTDI USB Serial Device converter detected
[ 2777.755151] usb 2-2.2: FTDI USB Serial Device converter now attached to ttyUSB0
The final line listed above is the important one - that it is attached to ttyUSB0. With this knowledge we can set-up minicom to listen to output from the device:
minicom --device=/dev/ttyUSB0 --baudrate=38400
Note: minicom can be a bit tricky to get started with. It requires a fair amount of keyboard short cuts to navigate. The combination of Ctrl+a, z (Control and a pressed simultaneously, followed the z key by itself) will bring up the help menu. Ctrl+a, x will exit minicom.
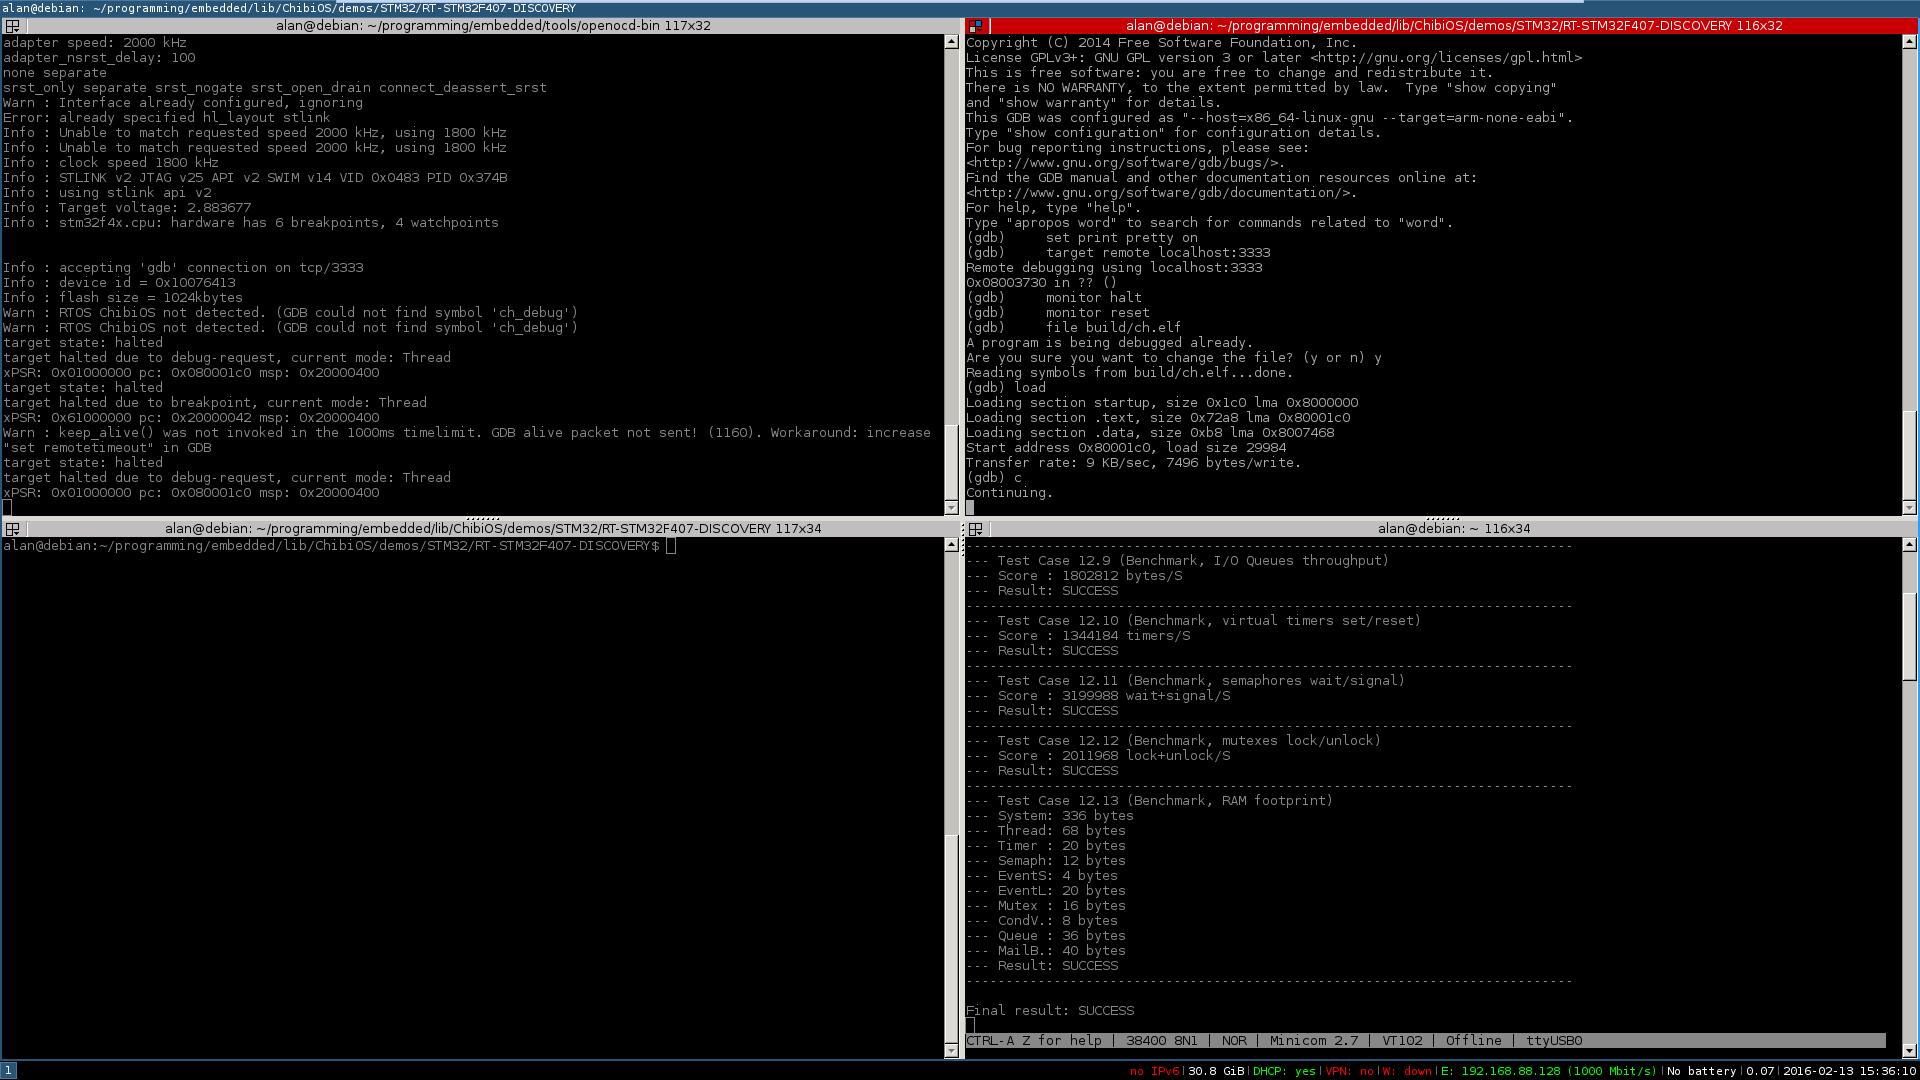
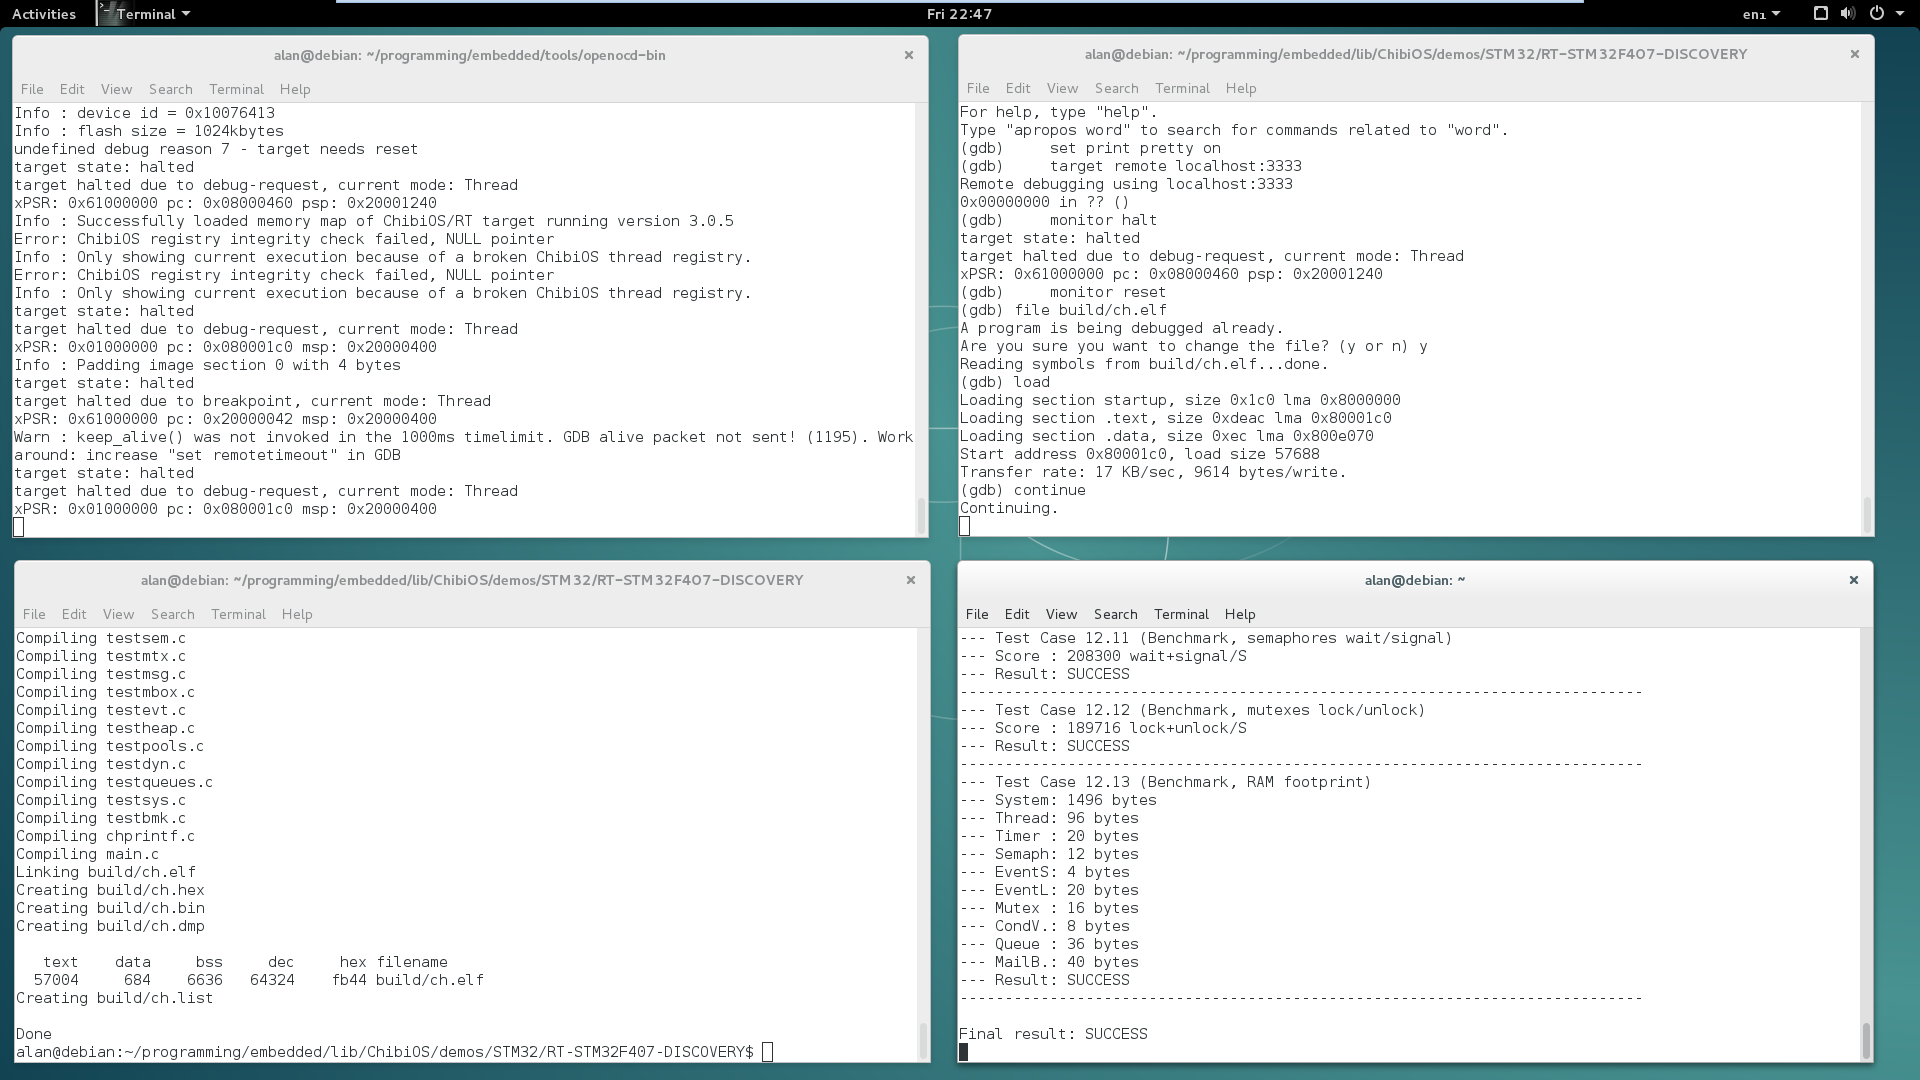
To test the UART is working, briefly hold the blue button (labelled “User” / “B1”) on the STM32F4DISCOVERY, while the demo is running on the board. This will start a ChibiOS test suite - with results from the tests being output over serial. Hopefully, this should end with the output: “Final result: SUCCESS” as can be seen in the bottom right terminal of the below screenshot.
Software Versions
Its very likely that sooner than later, one of the pieces of software I documented here will change a configuration step or dependency and break this guide. So, mainly to keep me right, below is a list of packages and sources which were used when writing this.
| Package | Version | Source |
|---|---|---|
| VMware Workstation | 12.1 | http://www.vmware.com/uk/products/player |
| Debian | 8.3 | https://www.debian.org/distrib/ |
| OpenOCD | v0.9.0 | git://git.code.sf.net/p/openocd/code openocd |
| ChibiOS | 06b3684c2c1aeec415cc37da463c893d16917cc3 | https://github.com/ChibiOS/ChibiOS.git |
| Everything Else | Default | From apt |
Where to go from Here?
At this point you have a working Debian VM with all the base packages required to compile and flash programs to the STM32 discovery board. I purposely avoided making any recommendations outside the scope of this purpose to keep the install as clean and small as possible.
In this section I am going to suggest a few packages/tools which I find useful in my workflow. Admittedly they will not be everyone’s cup of tea.
-
Text Editor - I’m actually not going to directly recommend anything here, to avoid getting involved in a holy war that has been going on long before I came to the scene (see obligatory XKCD). I happily use vim (well gvim) day to day, but understand completely that it’s not going to be everyone’s liking. Debian provides a list of some text editors which are worth investigating. Or perhaps you would prefer to use an IDE?
-
Terminator - My terminal emulator of choice. Its main benefit in my option is the ability to split a terminal window either vertically or horizontally with
Ctrl+Shift+eandCtrl+Shift+orespectively. AlsoCtrl+shift+fwill open a search box, allowing you to search for text in the scroll back. It can be installed with:sudo apt-get install terminator -
i3 - My window manager of choice for development. It’s a tiling window manager, as opposed to the more popular floating variety. This means (for the most part), there is only one “layer” available, so when a new window is created, existing windows are reduced in size to share the screen. (i.e. the new window is not opened on top of other windows). It can be installed by simply issuing the command below. At the Debian login screen, you can select which window manager you want to use for that session.
sudo apt-get install i3
The below screenshot shows the same processes running as the above, except using the i3/terminator combination.